
WayCool changelog
The Scheduler Report is back & other scheduler improvements
Reporting
Scheduler
What's new
"Where did the Scheduler Report go?"
If you moved from CoolFocus 3, you probably asked. PCC Reports > Schedule was one of the most-run reports in the whole system, and it was not there in CoolFocus 5. We gave the List tab every column the old report had and grouped it by day, and people kept asking anyway. One of you put it best: "Print screen isn't what I want. Export to Excel isn't either."
You were right. What the front desk needs is a sheet: today's appointments, on paper, for the person at the door who never logs in.
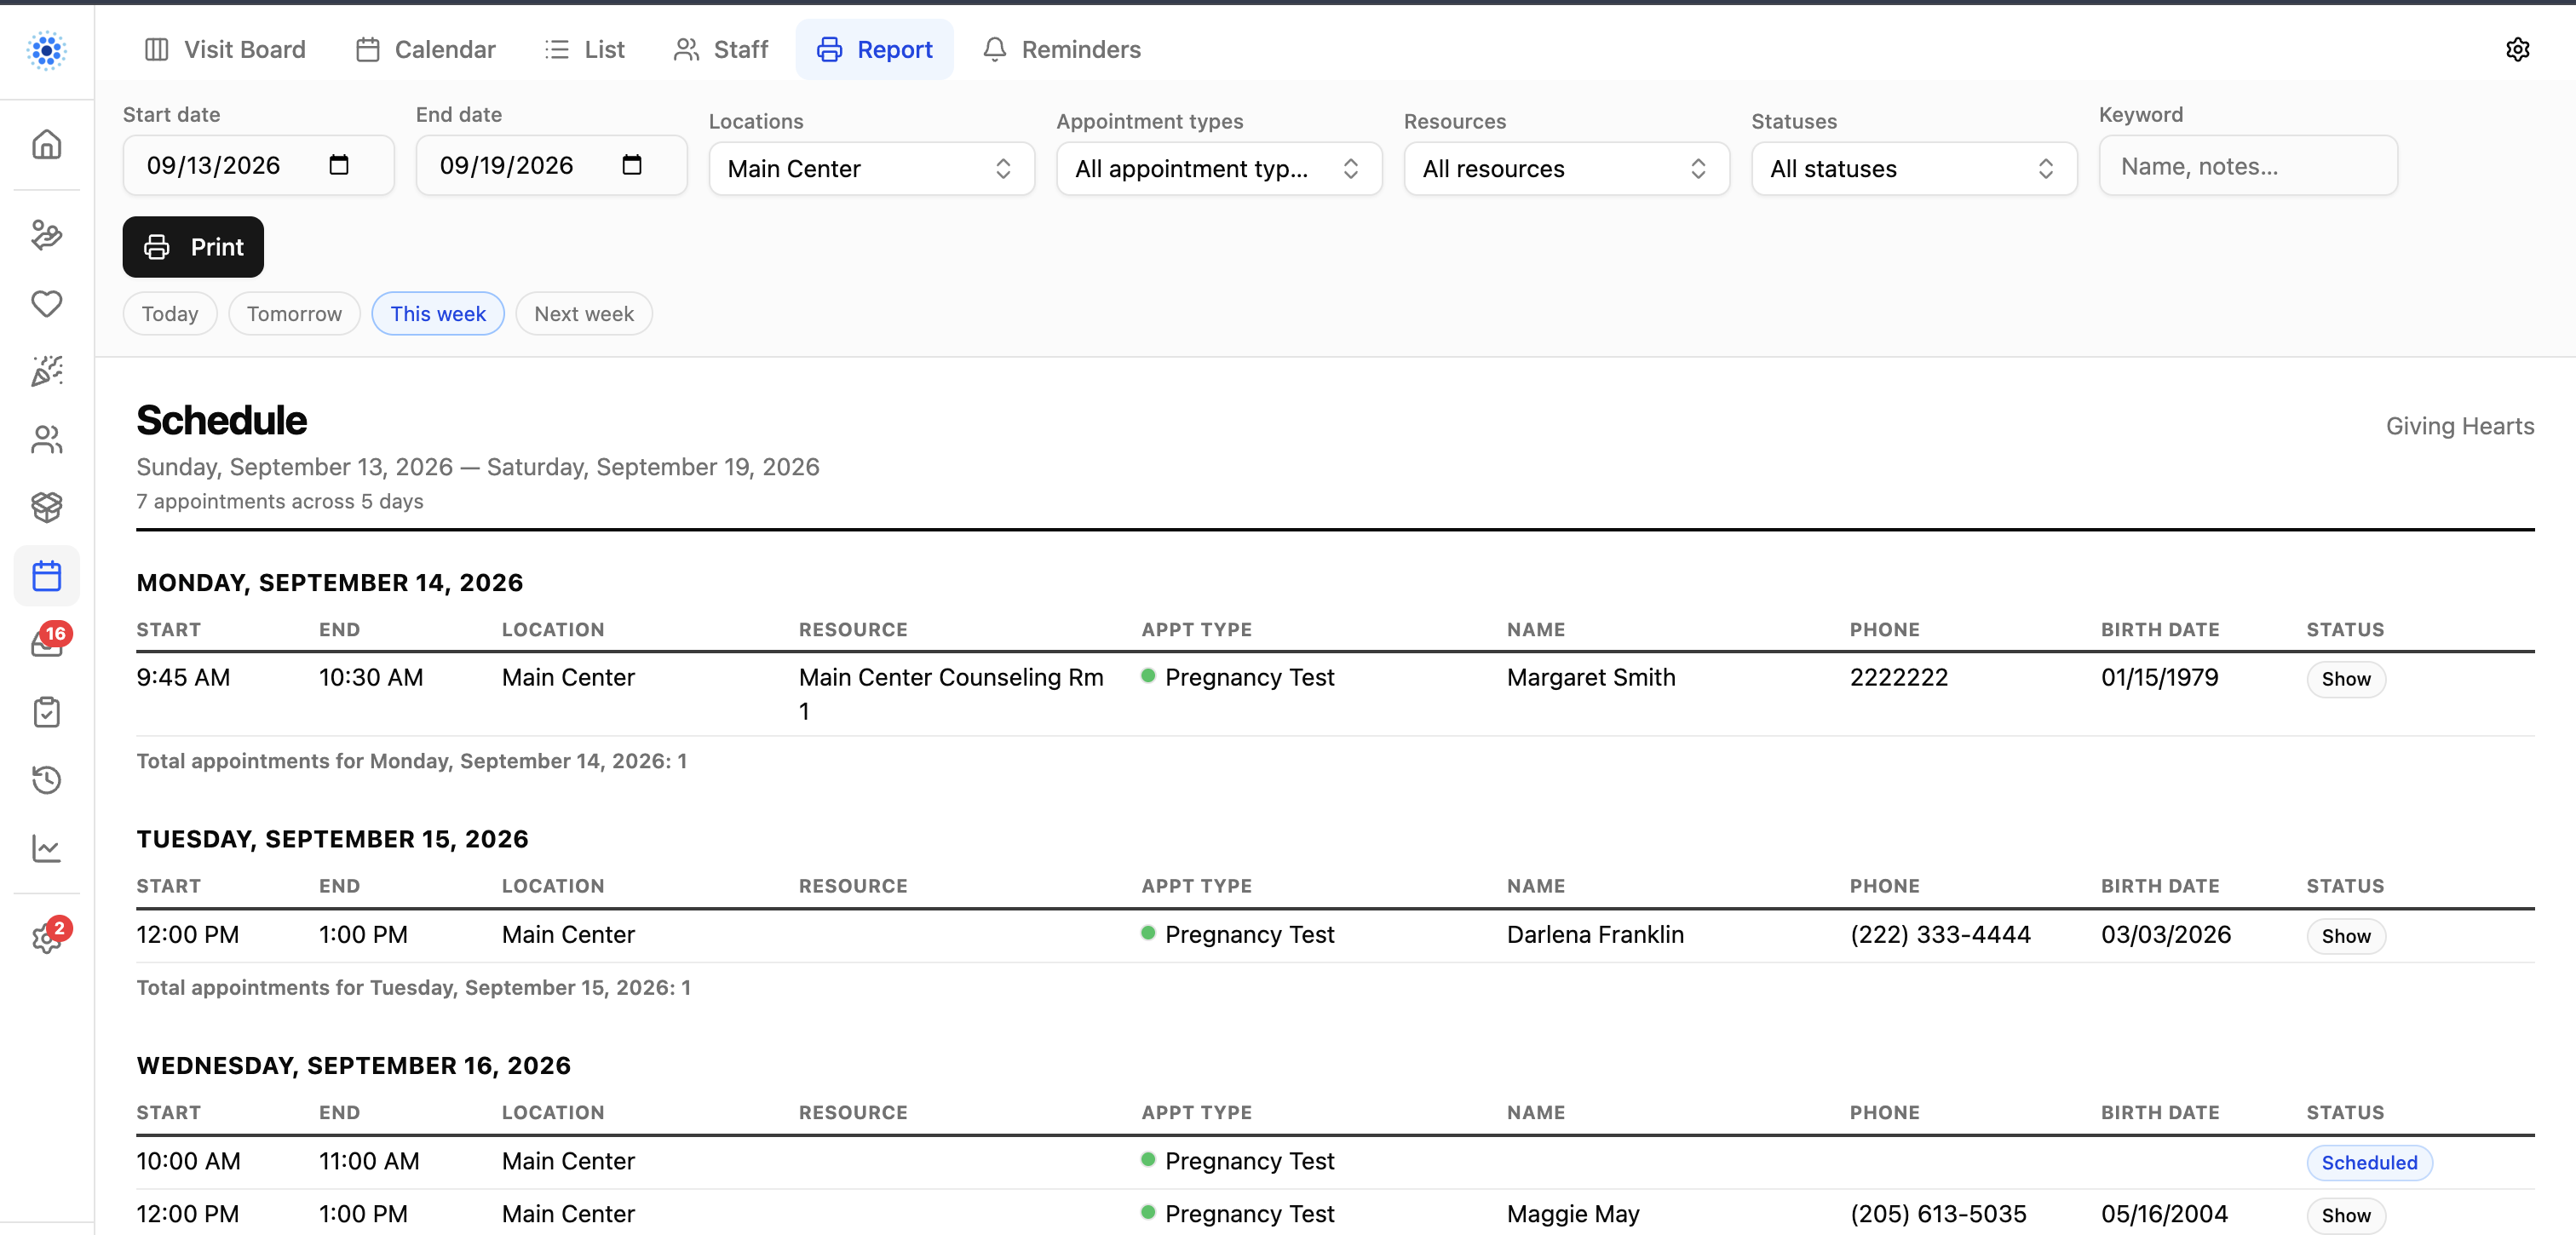
So we built it again, and built it better. Open Scheduler and click the new Report tab.
How to use it
Pick a date range, or click a preset: Today, Tomorrow, This week, or Next week. Narrow it by Location, Appointment type, Resource, or Status, or search for a name. Then click Print.
You get a landscape sheet, grouped by day, with a count for each day. Each row shows the start and end time, location, resource, appointment type, client name, phone, birth date, and status. Just the schedule prints; the filter bar and the rest of CoolFocus stay off the page. Column headings repeat when a busy day runs onto a second sheet.
If you are already on the List tab, there is a Print report button in the toolbar that takes you straight there.
What's better than the old one
Relative dates. The CoolFocus 3 report only took two fixed dates. "Next week" here means next week every time you open it, so the Thursday routine of printing next week's schedule is one click.
Bookmarkable. Your range and filters live in the page address. Bookmark "next week at the north location" and it is one click from then on.
Color. Appointment types print with their color swatch and statuses print as colored pills, the same colors you see on the calendar. Browsers normally strip color when printing; this sheet keeps it.
The List and the Report always agree. Both use the same rules for which day an appointment falls on, so a sheet never shows an appointment on a different day than the screen does.
Where the Subject column went
The CoolFocus 3 printout had a Subject column. The new sheet does not, and that is a deliberate choice rather than something we forgot in the rebuild.
In CoolFocus 3 the subject line was free text, and it filled up with client names, appointment types, and staff schedules — information that belongs in real fields, and that no center wants appearing on a shared screen, a printed schedule, or a synced calendar. CoolFocus 5 books against structured data instead and fills the subject with the appointment type name for you. On the old printout, that column had quietly become a second copy of the appointment type: "Ultrasound" printed next to "Ultrasound."
So the sheet spends that space on End Time, Phone, and Birth Date, which is what centers actually asked us for.
If what you really want is control over what staff read at a glance on the calendar, that is a genuine setting, and it got considerably better this month.
Choose what each appointment type shows on its calendar card
This one came from a center director with a confidentiality problem, and it is worth explaining because the old setting genuinely did not work.
The calendar card used to have a single switch for the client's name: on, or off. A center told us both settings failed them. A full first and last name on screen was a confidentiality risk any time a client, a volunteer, or a donor walked past the front desk and glanced at the monitor. Turning the name off entirely left staff unable to tell one appointment from another at eight to twelve new clients a day. There was no setting in between, and "turn the name off" was what our own support team had been recommending.
So the switch became a menu. Open Settings → Scheduler → Appointment Types → [appointment type] → Overview → Scheduler card display.
Client name now offers seven levels of disclosure:
Full name — Ashley Smith
First name — Ashley
First name + last initial — Ashley S.
Initials — A.S.
Last name — Smith
Client number — 10428
Hidden
Most centers with a visible front-desk screen land on First name + last initial or Initials: enough to know who is coming, not enough to identify anyone from across the room. The settings panel previews a sample card as you choose, so you can see the disclosure level before you save.
The rest of the card
While you are in there, the same panel controls the whole card:
Appointment type and Time are checkboxes. Turn either off if the card is too busy.
Main field decides what gets the emphasized top line: the client name, the appointment type, or your first optional field.
Up to five optional fields can be added, in the order you pick them. A field with no value hides itself rather than printing a blank line.
Optional fields come from the appointment itself (status, location, resource, referral source), from the client record (date of birth, age, phone, preferred contact, and more), and from any booking question attached to that appointment type. So a card can show exactly what your team needs to triage the day, pulled from real fields rather than from something somebody typed.
Two things worth knowing. This is set per appointment type, so a center can show full names on staff meetings and initials on client services. And it only changes the card: staff who can open the client record still see everything they always could.
Full walkthrough: Client Name Display Options on Scheduler Cards
Also in Scheduler since our last update
It has been a busy two weeks for scheduling. Everything below is already live.
Calendar and appointments
Add Appointment now shows which times are open for the appointment type you picked, instead of every slot looking the same.
Reschedule refreshes its times when you change the resource group, including to Unassigned.
My Schedule shows your appointments at every selected location, not just the first one.
Single-location organizations no longer get a location picker, or the "select at least one location" message. Scheduler just opens.
Start Visit no longer warns that required forms are incomplete when they are done.
The appointment List tab gained End Time, Phone, and Birth Date columns and can group by day.
Staff names on the scheduler link to the right Serve record, whether the person is staff or a volunteer.
Work schedules and templates
The Monday-to-Sunday weekly template is back on schedule templates, with per-day slot capacity, alongside a separate Exceptions & holidays calendar for one-off closures. The week-by-week workspace stays for Serve team rostering.
Deleting a work schedule row now deletes it. It used to say "removed" and leave the row in place.
Online booking
The booking window honors what you configured. A 60-day window showed two weeks; it now shows 60 days.
The booking calendar opens on the first month with an opening and shows a Next available shortcut, including in the embedded widget.
Clients can be allowed to reschedule themselves, per appointment type. Turn on Allow Client Self-Rescheduling on an appointment type. When a client texts "reschedule" to a reminder, allowed types get a link to pick a new time; other types get your call-the-office message. Reminder templates can include a new RescheduleUrl merge field.
An optional SMS consent checkbox on booking forms, unchecked by default, and shown automatically for organizations set up to text clients. Only an explicit tick records consent.
Online booking stops adding more duplicate client records when a person already has duplicates sharing an email.
The Schedule Appointment button no longer goes dead when the booking questions fail to load; it recovers and lets the client retry.
Reminders, texting, and surveys
The staff "Send confirmation text" checkbox is honored on appointments staff create, even for organizations without automated reminders.
Reminders show up in the Inbox conversation, and the right one: the reminder the client actually replied to.
Reminder status is accurate on the appointment. A queued text no longer shows next to "SMS reminders off."
Texting a client you just created while booking works, instead of failing with "no valid phone number."
After-appointment surveys: a Send Survey Now action on the appointment, and a place to read the responses on the client record and the visit record.
Visit Board
The Visit Board updates live for everyone. When one person checks a client in or starts a visit, every other open Visit Board reflects it without a refresh.
Help
Step-by-step guide: Printing the Scheduler Report
This one exists because you kept asking for it. If there is another report from CoolFocus 3 you are still missing, reply to support and tell us which one. That is exactly how this one got built.